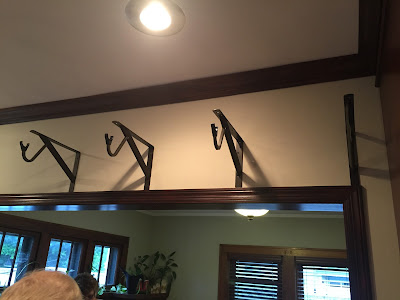
But the kitchen still needed something. The cabinets didn't provide enough space for my pots and pans; some had been sitting on the stove since I moved in. So I decided... I needed a pot rack! This space above the counter/breakfast bar through to the dining room was all boring and PERFECT for the pot rack!
 |
| Boring and empty! |
Here was my design (on a post-it):
 |
| I thank Mrs. Harry for my ability to draw perspectives |
Can you picture it?
I found heavy-duty shelf brackets with a rod holder at Menard's ($6 each). They claim a pair will hold 500 pounds! My pots won't weigh that much! I wasn't sure how long I wanted it to be, either 3 feet or 4 feet. Once my parents got here on Friday, they helped hold up the brackets to get a feel for it. Dad found studs in the wall (16" apart as usual) and put the first 3 brackets in with dry-wall screws so they'd hold REALLY well. Then we decided to make it 4 feet wide so we had to get another bracket. And the rod, which I forgot to buy the first time I was at Menard's. (I was there 3 times in 4 days. I kind of know my way around now.)
 |
| Just the brackets |
The last thing to figure out was the shelf. You can get laminated 4-food shelf boards at Menard's in 3 widths, but we agreed there should be some over-hang on each side. So we thought we'd look around for something else, or stain/paint some plain wood boards. That sounded like work. Until my Mom found 6 pieces of 1x6's in the basement (by the boiler, there's rando stuff everywhere) and 2 of them next to each other fit PERFECTLY! Didn't even need to trim them. We also found paint to match the rest of the trim in the kitchen, so we painted those up yesterday. (side note: I inherited a lot of paint)
Last night we didn't have screws to hang the shelves and finish the project! I thought, out of Dad's huge basket of screws, he'd have some 3/4" ones, but noooo. So today while we were out for Grand Old Day, he went into the Ace hardware store and picked some up. But only 11, and we needed 12! haha. Bad counting.
 | ||
| Pre-drilling the screw holes and sucking up the sawdust |
 |
| All it shall hold is cookies |
Finished! I could get some more of the hangers and fit a few more pans up there.
In summary:
- 4 brackets: $24
- 6 foot Rod (cut down): $19
- End caps: $6
- Hangar hooks: $10
- Shelves and screws: free
- Total: $59!
The other project that dad mostly did by himself was upgrade the attic vent to a power vent (with thermostat), and add 3 aluminum eave/soffit vents. Drilling holes in the stucco was scary for me, I was afraid I'd end up with big holes to repair. But he did a fine job. I helped put up the eave vents. No crawling on the roof for me!

